
Playwright Tutorial for Beginners: Installation and Hands-On Overview
- Anuradha Agarwal
- Feb 11
- 15 min read

Updated: Apr 30
Playwright is a modern end-to-end test automation framework designed for reliable, cross-browser testing using a single unified API. It supports Chromium, Firefox, and WebKit, and comes with a powerful built-in test runner, automatic waiting mechanisms, parallel execution, and rich HTML reporting. In this Playwright tutorial for beginners, we will go beyond basic installation and understand how Playwright fits into a modern TypeScript-based automation workflow.
This guide walks through installing Playwright using Node.js, setting up a TypeScript project structure, and understanding how the Playwright Test Runner discovers and executes test files. You will write and run your first test, explore how fixtures like page are injected automatically, and see how assertions using expect() validate browser behavior. We will also briefly examine how Playwright manages browser contexts, test isolation, and execution artifacts such as reports and test results.

Prerequisites
Check Node + npm Installation
Open Command Prompt / Terminal and run:
node -v
npm -v
In case you do not have the setup installed, follow these steps till vscode install
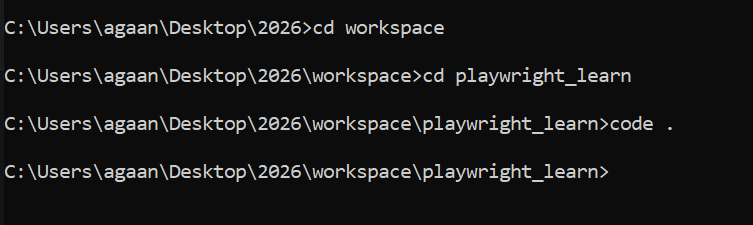
Create your project folder and open VS Code
mkdir playwright_learn
cd playwright_learn
code .
Install Playwright
Run this inside your project folder:
npm init playwright@latest

You will see prompts like these:
Prompt A: TypeScript or JavaScript?
Choose:
TypeScript (best for jobs + Playwright projects)
or JavaScript
Prompt B: Where to put tests?
Common choice:
tests
Prompt C: Add GitHub Actions workflow?
Choose:
Y if you want CI later (good practice)
n if you don’t need it now
Prompt D: Install browsers?
Choose:
Y (recommended)
After this, Playwright creates files + installs packages and browsers.

Understand Playwright Folder Structure
After installing Playwright, several folders and files are created automatically. Each one has a specific role in how Playwright works . Let's understand each one by one:

📁 node_modules/
Contains all libraries (dependencies) installed for your project
Example:
@playwright/test (Playwright test runner)
browser-related packages
Do not edit this folder
Never push it to GitHub
📁 tests/
This folder holds all Playwright test files
Playwright creates a sample test file by default, for example:
example.spec.ts
About .spec.ts
spec has no special technical meaning
It is a naming convention
It indicates:“This file contains test specifications”
Common naming examples:
login.spec.ts
checkout.spec.ts
order-flow.spec.ts
login.test.ts also indicates test specification
📄 .gitignore
Tells Git which files should not be committed
Typical ignored items:

Keeps the repository clean and professional.
📄 package.json
This file describes your project metadata and scripts.
It includes:
Project name & version
Dependencies (@playwright/test)
Scripts to run tests
Example:
"scripts": {
  "test": "playwright test",
  "test:ui": "playwright test --ui"
}
📄 package-lock.json
Locks exact dependency versions
Ensures consistent installs across machines
Auto-generated — don’t edit manually
📄 playwright.config.ts (Main Configuration File)
When working with Playwright, one of the most important files in your project is:
playwright.config.ts
This file is the brain of your Playwright automation framework. It controls how Playwright discovers tests, launches browsers, applies timeouts, and generates reports.
Instead of repeating settings in every test file, we define them once here and Playwright applies them automatically across the project.
Starting with the Simplest Configuration
We intentionally removed the pre-populated options and built our configuration step by step to clearly understand each setting.
Our current configuration looks like this:
import { defineConfig } from '@playwright/test';export default defineConfig({ testDir: './tests', timeout: 40 * 1000, expect: { timeout: 40 * 1000, }, reporter: 'html', use: { browserName: 'chromium', headless: false, },});Let’s understand each part.
testDir – How Playwright finds your tests
testDir: './tests',This tells Playwright that all test files are located inside the tests folder.
Example project structure:
project root ├── tests │ ├── login.spec.ts │ ├── cart.spec.tsWhen you run:
npx playwright testPlaywright automatically:
• goes to the tests folder• finds files matching .spec.ts or .test.ts• executes all test() blocks
You can also run a specific test:
npx playwright test tests/login.spec.tsThis automatic discovery is why folder structure and naming conventions are important.
timeout – Maximum time allowed for a test
timeout: 40 * 1000,This sets the maximum test execution time to 40 seconds.
Playwright waits for:
• page loads• elements to appear• actions to complete
This is especially useful for:
• legacy applications• heavy dashboards• slow-loading components
We write 40 * 1000 because Playwright expects time in milliseconds.
expect timeout – Maximum wait time for assertions
expect: { timeout: 40 * 1000,},This controls how long Playwright waits for assertions.
Example:
await expect(page.locator('#orders')).toBeVisible();Playwright will wait until the element appears or timeout occurs.
This automatic waiting makes Playwright tests reliable and less flaky.
reporter – Generating HTML reports
reporter: 'html',This generates a detailed HTML report after test execution.
You can open it using:
npx playwright show-reportThe report shows:
• passed tests• failed tests• execution time• debugging details
Reports are very useful for analyzing automation results.
browserName – Choosing the browser
browserName: 'chromium',This tells Playwright to run tests using the Chromium browser.
Playwright supports:
• chromium• firefox• webkit
Chromium is the most commonly used browser in automation.
headless – Running browser in visible or background mode
headless: false,This runs the browser in headed mode, meaning you can see the browser window.
This is useful for:
• learning• debugging• understanding test flow
For CI/CD or faster execution, you can set:
headless: true,This runs the browser in background.
Why playwright.config is TypeScript and not JSON
Playwright uses TypeScript instead of JSON because TypeScript allows logic and flexibility.
JSON is limited:
• cannot use conditions• cannot use environment variables easily• cannot reuse variables• cannot write logic
With TypeScript, we can do things like:
const isCI = !!process.env.CI;export default defineConfig({ timeout: isCI ? 60000 : 40000, use: { headless: isCI ? true : false, },});This allows environment-specific configuration.
TypeScript also provides:
• autocomplete• type safety• reusable logic
This makes Playwright suitable for real-world frameworks.
What happens when you run a test
When you execute:
npx playwright testPlaywright performs these steps:
Reads playwright.config.ts
Finds test files in testDir
Launches the configured browser
Applies timeout and execution settings
Runs tests
Generates HTML report
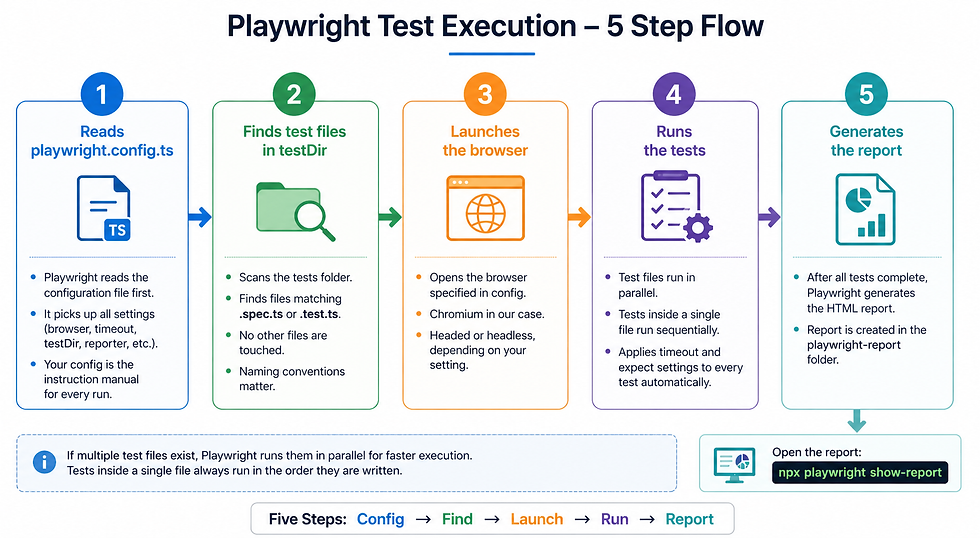
If multiple test files exist, Playwright runs them in parallel for faster execution.
Tests inside a single file run sequentially.
Summary
The playwright.config.ts file is the central control point of your automation framework.
It defines:
• where tests are located• which browser to use• timeout settings• report generation• headless or headed execution
We started with a minimal configuration and gradually enhanced it to understand each option clearly.
As we continue building our framework, we will add more powerful settings like:
• baseURL• storage state• retries• custom fixtures
This step-by-step approach ensures a strong foundation for building scalable and reliable Playwright automation frameworks.
The playwright.config.ts file is the central control point of your Playwright automation framework.
Think of it as the brain of your Playwright project.
It controls how tests are located, executed, and reported.
Using this file, you can configure:
Test directory location
Browser behavior
Timeout settings
Retry logic
Base URL
Reporting format
Headed or headless execution
Instead of repeating these settings in every test, we define them once in this configuration file.
Minimal Playwright Config (Starting Simple)
To understand each option clearly, we start with a minimal configuration:

This configuration defines the basic execution behaviour for the entire project.
we will gradually enhance it to

testDir – Where Playwright finds tests
testDir: './tests'This tells Playwright that all test files are located inside the tests folder.
Whenever you run:
npx playwright testPlaywright automatically discovers and executes all test files inside this folder.
timeout – Maximum time allowed for each test
timeout: 40 * 1000This sets the test timeout to 40 seconds.
We write 40 * 1000 because Playwright expects timeout in milliseconds.
This means Playwright will wait up to 40 seconds for the test to complete before failing it.
This is useful for:
slow-loading pages
heavy applications
large components like web tables
expect timeout – Maximum wait time for assertions
expect: { timeout: 40 * 1000,}This controls how long Playwright will wait for assertions to pass.
Example:
await expect(page.locator('#orders')).toBeVisible();Playwright will wait up to 40 seconds for the element to appear.
This automatic waiting makes tests more reliable.
reporter – Generate HTML execution report
reporter: 'html'This tells Playwright to generate an HTML report after test execution.
You can open it using:
npx playwright show-reportThe report provides:
pass/fail status
execution time
debugging information
This is extremely useful for analyzing test results.
browserName – Selecting the browser
browserName: 'chromium'This tells Playwright to run tests using the Chromium browser.
Playwright supports multiple browsers:
chromium
firefox
webkit
Chromium is the most commonly used browser for automation.
headless – Controlling browser visibility
headless: falseThis runs the browser in headed mode, meaning the browser window will open and you can see the test execution.
This is useful during learning and debugging.
For CI/CD or faster execution, you can set:
headless: trueto run the browser in the background.
How Playwright uses this configuration
When you run:
npx playwright testPlaywright:
Reads playwright.config.ts
Finds test files inside testDir
Launches Chromium browser
Applies timeout and expect settings
Runs tests
Generates HTML report
Why Playwright config is TypeScript and not JSON
Playwright uses TypeScript instead of JSON for configuration because TypeScript allows logic and flexibility.
Limitations of JSON
JSON is static and limited:
Cannot contain logic
Cannot use conditions
Cannot use environment variables easily
Cannot reuse variables
Advantages of TypeScript configuration
Because Playwright config is TypeScript, you can write dynamic logic.
Example: Different timeout for CI vs local execution
timeout: process.env.CI ? 60000 : 30000Example: Running headless only in CI
use: { headless: process.env.CI ? true : false,}Example: Reusing variables
const isCI = !!process.env.CI;Benefits include:
flexibility
environment-specific configuration
code reuse
autocomplete and type safety
This makes Playwright config powerful and production-ready.
▶ Run Playwright Tests
Now that Playwright is installed and the folder structure is ready, let’s understand how to execute tests.
🖥 Run Tests Using Command Line (CLI)
The basic command to run Playwright tests is:
npx playwright test
What happens by default?
Playwright reads configuration from playwright.config.ts
By default, it runs tests in 3 browsers:
Chromium
Firefox
WebKit
The sample example.spec.ts file contains 2 test cases, so you’ll see multiple executions (2 tests × 3 browsers).

📊 View HTML Report
After execution, you can open the test report using:
npx playwright show-report
This opens a beautiful HTML report in the browser showing:
Passed / Failed tests
Execution time
Screenshots (if configured)
Detailed logs
🌐 Run Tests in a Specific Browser
To run tests only in a specific browser, use the --project option:
npx playwright test --project=chromium
By default, tests run headlessly (browser runs in the background without UI).

👀 Run Tests in Headed Mode (See Browser)
To actually see the browser execution:
npx playwright test --project=chromium --headed
Although the browser opens, execution is usually very fast.

📂 Run a Specific Test File
By default, all files inside the tests/ folder are executed.
To run a particular file:
npx playwright test example.spec.ts --project=chromium --headed
🔎 Run a Specific Test by Name
If you want to run only one specific test case:
npx playwright test -g "has title" --project=chromium --headed
The -g option matches the test name.
⏭ Skip a Test
To skip a test:
test.skip('test name', async ({ page }) => {
  // skipped test
});
🎯 Run Only One Test (Debugging Mode)
To execute only a particular test while debugging:
test.only('test name', async ({ page }) => {
  // only this test runs
});
Note:
After running your Playwright tests using:
npx playwright test

Playwright automatically generates two folders:
test-results/ → stores raw test execution data such as screenshots, videos,
and trace files.
playwright-report/ → contains the HTML report (index.html) that shows test results in a browser.
You do not need to create these folders manually. They are automatically created every time tests are executed.
If deleted, they will be recreated during the next test run.
📌 These folders are generated artifacts and are usually added to .gitignore in real projects.
🧪 Running Tests Using VS Code UI
Command line is powerful — but Playwright also integrates beautifully with VS Code.

✅ Install Playwright VS Code Extension
Open VS Code
Go to Extensions
Search for: Playwright Test for VS Code
Install it

🧭 Use Test Explorer
After installation, you’ll see a Testing icon in the left sidebar.

Clicking it opens the Test Explorer view, where you can:

See all available tests
Run all tests
Run selected tests
Debug tests
⚙ Browser & Execution Settings in Explorer
At the bottom panel in Test Explorer, you’ll find options for:
Browser selection
Headless / Headed mode
Debug mode
🔄 Difference Between CLI and VS Code Execution
When running from CLI:
The browser closes immediately after execution
When running from VS Code UI:
The browser remains open after execution
Allows manual exploration of the application
This is very useful during debugging.
Even in headless mode, the Explorer shows:
Live execution status
Test runtime updates
🧠 Run Tests in Playwright UI Mode
Another powerful option is running:
npx playwright test --ui
This opens the Playwright Test Runner window.

It provides:
Visual test timeline
Before & After action states
Step-by-step execution
DOM snapshots
Debug-friendly interface
This mode is extremely helpful for:
Beginners
Debugging failures
Understanding test flow
You now know how to:
Run all tests
Run specific files
Run specific tests
Run in specific browsers
Run in headed mode
Skip or isolate tests
Use VS Code Test Explorer
Use Playwright UI mode
Trace View and Debug
We already saw how UI Mode (--ui) provides a rich, step-by-step view of test execution, including action states (before/after each step). Now let’s learn how to get the same level of debugging detail even when running tests from the command line — especially useful for CI/CD pipelines.
Enable Trace in CLI Mode
You can enable tracing while running tests using:
npx playwright test --project=chromium --trace on
What happens after you run this?
Playwright captures a detailed trace for the test run.
When you open the HTML report, you’ll notice a new section called Traces.
To open the report:
npx playwright show-report

✅ In the report:
You’ll see a Traces tab/section
Clicking a trace opens a viewer that looks very similar to what we saw earlier in Playwright UI Test Runner

You’ll be able to inspect:
Each step executed
Before/after state
DOM snapshots
Network activity
Console logs (if enabled)
Why Trace is Powerful in CI/CD
In local execution, you can easily rerun tests. But in CI pipelines, when a test fails, you usually don’t have:
the browser screen
Your local machine access
the ability to “watch it again” easily
✅ With trace enabled, you can:
Download the report artifact from CI
open it locally
Replay exactly what happened step-by-step
This makes debugging CI failures much faster.
Trace Settings in playwright.config.ts
Instead of passing-- trace every time, you can control trace behaviour from configuration.
Example:
use: {
  trace: 'on-first-retry',
}
What does on-first-retry mean?
It means:
Trace is not collected on the first run
If the test fails, and Playwright retries it,
Trace is collected only on the first retry
✅ Why is this a good default?Because traces can be heavy in size. This setting saves storage and still captures useful debugging info when failures happen.
🔁 Change Trace to “Always On”
If you want tracing for every run:
use: {
  trace: 'on',
}
What does trace: 'on' mean?
Playwright collects traces for every test run
Useful during:
learning
debugging locally
short projects
Debug Using Playwright Inspector
Another powerful debugging option is running tests in debug mode, which opens the Playwright Inspector.
Run:
npx playwright test --project=chromium --debug
What opens?
The browser (usually in headed mode)
Playwright Inspector window

This is extremely helpful when you want to pause execution and inspect step-by-step.
▶ Inspector Controls
Inside Playwright Inspector, you get debugging controls like:
Resume (continue execution)
Pause
Step over (execute one action at a time)
Detailed action logs for each step
This gives you a very clear understanding of:
What Playwright is doing
What locator is being used
What action is happening
where exactly it fails
Create your First Playwright Test
Let's write and run a very simple Playwright test on a real-world style demo e-commerce website.
Test App (Demo Store):http://qa-cart.com
We will keep the test intentionally simple and focus only on:
opening the site
validating the page title
validating the header text
We will cover Playwright core concepts (fixtures, async/await, assertions, locators, etc.) in a separate section.
Prerequisite: Install SelectorHub (For Finding Locators)
To identify CSS selectors easily, install SelectorHub in your browser.
How to install
Open Chrome (or Edge)
Go to Chrome Web Store
Search: SelectorHub
Click Add to Chrome
SelectorHub helps you quickly inspect elements and copy selectors like:
CSS selectors
XPath (we will use CSS in this demo)
Create a New Test File
Inside the tests folder, create a new file:
tests/first-test.spec.ts
Add the Test Code
Copy and paste the code below:
/*
Writing first test
Test App
*************
http://qa-cart.com
**********************
Test Steps
**********************
1. Go to the home page
2. Assert if the title is correct
3. Assert header text
**********************
*/

import { test, expect } from '@playwright/test';

test("Load Home Page", async ({ page }) => {

  // 1. Go to the home page
  await page.goto("http://qa-cart.com");

  // 2. Assert if the title is correct
  await expect(page).toHaveTitle("QA TEST AUTOMATION DEMO STORE BY ANURADHA AGARWAL");

  // 3. Assert header text
  await expect(page.locator(".site-title:visible"))
    .toHaveText("QA Demo Store - Anuradha Agarwal");

});
Why We Used: visible in the Locator
On this demo store, some elements exist twice:
one version for desktop
one version for mobile
Sometimes one is visible and the other is hidden, but both match the same selector.This can cause Playwright to fail with errors like “strict mode violation” or “multiple elements found”.
To avoid that, we deliberately used:
.page.locator(".site-title:visible")
This tells Playwright:
“Only pick the element that is currently visible on the page.”
Run the Test
Open the terminal in your project root and run:
npx playwright test project=chromium --headed
View the HTML Report
After the run completes, open the report:
npx playwright show-report
This will open Playwright’s HTML report in your default browser so you can view:
pass/fail status
test steps
error details (if any)
Important Notes for Your First Playwright Test
Before moving ahead, there are a few important things every beginner must understand. These small details can save hours of confusion.
1️⃣ Test File Name and Folder Structure Matter
Playwright automatically discovers test files based on:
The tests/ folder
File naming pattern like:
*.spec.ts
*.test.ts
✅ Correct Example
tests/
  first-test.spec.ts
If you create the file outside the tests folder or do not use .spec.ts or .test.ts, Playwright may not detect it.
❌ Common Mistake
src/first-test.ts ← Playwright will not run this automatically
📌 Always keep test files inside the tests folder unless configured differently in playwright.config.ts.
2️⃣ Test Case Name Is Important
test("Load Home Page", async ({ page }) => {
The string "Load Home Page":
Appears in reports
Helps identify failures
Should clearly describe what the test verifie
3️⃣ The await Keyword Is Critical
Most Playwright operations are asynchronous.
Without await, the test may:
Move to the next step too early
Fail unexpectedly
Become unstable
Example (Correct)
await page.goto("http://qa-cart.com");
await expect(page).toHaveTitle("QA TEST AUTOMATION DEMO STORE BY ANURADHA AGARWAL");
❌ Without await
page.goto("http://qa-cart.com"); // ❌ Missing await
This may cause:
Assertion running before page loads
Random test failures
📌 Beginner Rule:
If Playwright is doing something (clicking, navigating, asserting), it usually needs await.
Troubleshooting Your First Test
Here are common issues beginners face and how to fix them.
❗ Test Not Running
Possible Reasons:
File is not inside tests/
File name is not .spec.ts or .test.ts
Syntax error in file
Run:
npx playwright test
If no tests are found, check folder and file naming.
❗ "Multiple elements found" Error
This happens when:
The page has duplicate elements (desktop + mobile versions)
The locator matches more than one element
Fix:
Use :visible
await expect(page.locator(".site-title:visible"))
  .toHaveText("QA Demo Store - Anuradha Agarwal");
❗ Title Assertion Fails
Check:
Exact spelling
Capitalization
Extra spaces
Title assertions are case-sensitive.
❗ Forgot await
If your test:
Fails randomly
Skips steps
Executes too fast
Check if await is missing.
❗ Website Not Loading
Open the URL manually in browser
Confirm internet connection
Confirm URL is correct
Beginner Checklist Before Running a Test
✔ File inside tests/
✔ File ends with .spec.ts
✔ Proper test name
✔ All Playwright actions use await
✔ Correct locators
✔ Correct URL
What’s Next?
Now that you have successfully written and executed your first Playwright test, we are ready to go deeper.
In the next section, we will explain Playwright core concepts in a beginner-friendly way, including:
Playwright Test Runner
The test() function
locator object
Fixtures (like page,browsercontext)
The expect() assertion library
The async / await model
Understanding Core Playwright Concepts
Let’s revisit our first test:
import { test, expect } from '@playwright/test';

test("Load Home Page", async ({ page }) => {

  await page.goto("http://qa-cart.com");

  await expect(page).toHaveTitle(
    "QA TEST AUTOMATION DEMO STORE BY ANURADHA AGARWAL"
  );

  await expect(page.locator(".site-title:visible"))
    .toHaveText("QA Demo Store - Anuradha Agarwal");

});
This small test already uses all the important Playwright core concepts. Let’s break them down clearly.
1️⃣ Playwright Test Runner
When you run:
npx playwright test
You are starting the Playwright Test Runner.
The Test Runner is responsible for:
Finding test files inside the tests/ folder
Running each test() function
Managing browser instances
Handling parallel execution
Generating reports
Managing retries
You don’t need Mocha, Jest, or any external framework. Playwright has its own built-in test runner.
📌 In our example, when we ran the command, the runner found first-test.spec.ts and executed the "Load Home Page" test automatically.
2️⃣ The test() Function
test("Load Home Page", async ({ page }) => {
The test() function defines a single test case.
It has two main parts:
The test name"Load Home Page" → appears in reports
The test function. This contains all the steps
Think of test() as:
A container that holds one automation scenario.
3️⃣ Fixtures (page, browser, browserContext)
Inside our test:
async ({ page }) => {
The page object is a fixture.
What is a fixture?
A fixture is a resource that Playwright automatically prepares and gives to your test.
In this case:
page represents a fresh browser tab
It is created before the test
It is closed after the test
You do NOT manually launch the browser.
Other built-in fixtures include:
browser
browserContext
request
Example with browserContext
test("Example", async ({ browser }) => {
  const context = await browser.newContext();
  const page = await context.newPage();
});
But in most beginner tests, you will use the page fixture directly.
4️⃣ The Locator Object
In our test:
page.locator(".site-title:visible")
This creates a Locator object.
What is a Locator?
A Locator represents a way to find an element on the page.
It does not immediately act. It defines how to locate the element.
For example:
const header = page.locator(".site-title:visible");
This does not click or validate anything yet. It just defines where the element is.
Playwright locators:
Automatically wait for elements
Handle visibility checks
Retry until timeout
📌 In our demo store, there are duplicate elements (desktop + mobile).That’s why we used:
:visible
to select only the visible one.
5️⃣ The expect() Assertion Library
Assertions verify that something is correct.
In our test:
await expect(page).toHaveTitle("...");
and
await expect(page.locator(...)).toHaveText("...");
expect() checks whether:
The page title matches
The element text matches
The element is visible
The element contains text
Without assertions, a test only performs actions. It does not validate behavior.
Assertions determine whether the test:
Passes
Fails
6️⃣ The async / await Model
Notice every Playwright action uses await.
await page.goto("http://qa-cart.com");
await expect(...);
Why?
Browser operations take time:
Page loading
Rendering elements
Network responses
JavaScript runs asynchronously.
If you remove await:
page.goto("http://qa-cart.com"); // ❌
The next line may execute before the page finishes loading.
This causes:
Random failures
Flaky tests
Hard-to-debug issues
How All Core Concepts Work Together
Here’s what happens when you run the test:
Playwright Test Runner starts
It finds the test file
It creates a browser
It creates a page fixture
It runs the test() function
It executes steps using async/await
It validates results using expect()
It closes the browser
It generates a report


Comments